Saturday, December 25, 2010

Wednesday, December 8, 2010

Living Room/Kitchen


Almost completed the living room opening/counter. It only needs to be stained to match the kitchen cabinets and coated with polyurethane.

Nursery


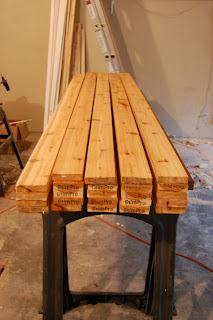
Baby Changing Station Phase 1/ Future Desk...

Tuesday, November 23, 2010

Nursery


A couple of schemes being tossed around for the baby changing table.

Tuesday, November 9, 2010

Nursery


Interior of the new window in the nursery with the 'box out' finished.

Nursery


This is a completed photo of the bumpout for the deeper nursery window that we found at the Re-Store. It was a brand new window that had been donated so I worked with its depth.

Wednesday, October 20, 2010

Nursery


The room is all cleaned up now and trimmed out, for now at least. We are still sketching out some ideas for some built in peices, other than that it just needs new outlets, switches, and a light fixture.

Tuesday, October 19, 2010

Nursery


One day at a time. This should be fairly nice once the window trim is in and the room cleaned up. There is of course always future projects, and I can thank Elisha for the paint color, although I did get to select the cream color.

It has been a constant cyclical redesign process until we both can give some form of approval to each new project.

Monday, October 18, 2010

Nursery


Here is the process over the last week for our little girls nursery construction project. I will upload the exterior modifications a little bit later.

Monday, October 11, 2010

Nursery


As we put the new window in its interesting to see the previous changes that have been made to the house by the many previous owners. The new window is mostly installed though now and the siding will go up soon so that we can turn our focus back to the interior.

Nursery


On the outside we are replacing the siding at the window with natural cedar lap siding.

Nursery


We decided to replace the window in the nursery before our little girl is born and found a lot of moisture in the wall from the old window. So in addition to putting in the window we picked up at the Restore we took down the interior to re-insulate the wall and replace the window.

Friday, September 17, 2010

Exterior


Here is some temporary work we are doing on the front of the house so it isnt such an eyesore for everyone. WE eventually plan on putting on a front porch - but eventually is never a gaurantee unfortunately.

Thursday, September 2, 2010

Progress


There are still handfuls of projects around to do, and many that will not be completed or even started for some time, but at least we now have functional space.

Tuesday, August 24, 2010

Repair + Refinishing Wood Floors


The floors are finished now finally. stripped and sanded the floors and applied 2 coats of poly.

Friday, August 20, 2010

DIning Room Floor


New floor in the dining room is installed. The next step is to finish the 2 patches in the living room so that we can sand and poly them soon.

Monday, August 16, 2010

DIning Room Floor


We removed the old wood floor in the dining room because of termite damage and found a few pieces of subfloor that we had to replace also. Now we have the boards repaired and the new floor is going in fairly easily.

Monday, August 9, 2010

Repair + Refinishing Wood Floors


Now the task of preparing and assesing the damage from the termites on the wood floors. We are already planning on completely replacing a 100 sq ft area with new T+G red oak in the dining room due to the damage. THe plan is to patch this corner though since it is nearly a 225 sq ft wood floor in this room.

Friday, August 6, 2010

Monday, August 2, 2010

Kitchen Progress


Not Finished by any means with the kitchen, however, it is now a fully functional kitchen.

Tuesday, July 27, 2010

Kitchen Progress


Making some progress in the kitchen now. The floor is not quite what we are going for but I think at this point it is what it is for now. I tstill needs to be buffed and possible waxed, but we are calling it finished for now.

Monday, July 12, 2010

Kitchen Progress


Only took us the entire weekend to install the sink - the plumbing and the new faucet only took a couple of hours, but the custom countertops may have caused most of the grief since the sink was made to be easily inserted into a laminate counter.

Wednesday, July 7, 2010

Bathroom Progress


One step closer with the built-in cedar closet infill. At this point the bathroom seems to have used more material than any other space in the house per sq. ft.

Tuesday, July 6, 2010

Bathroom Progress


Made some progress towards completing the bathroom over the holiday weekend. Its going to take more cedar and tung oil than I had anticipated which will likely drag this little project out even longer.

Thursday, June 24, 2010

Kitchen Progress


We have the countertops installed now. I just finished grinding out about 1/4" of one of teh countertops to get the sink to sit in place. We also go the wax for the counters delivered and put it on. It is a great resource for concrete countertop materials if you don't want to attempt the completely from scratch method I've been using. Cheng also has done some great houses from concrete.

Monday, June 14, 2010

Kitchen Progress


Have the countertops mostly shimmed and installed. Now We need to get or wax for the counters som we can finish them and get the sink front and back figured out so we can install it.

Thursday, June 10, 2010

Kitchen Progress


Countertops are being finished in the garage still. We had Elisha's Family come by and do a great painting job. Got a start on the floor as well, and put up a few of the side panels on the cabinets.

Kitchen Progress


Step by step. Dry fit on the unfinished countertops.

Sunday, May 23, 2010

Bathroom Progress


We have all the cedar and tile put up now on the sink wall now. Almost Done with the bathroom now. We just have to build the closet piece now on the opposite wall.

Wednesday, May 19, 2010

Bathroom Progress


Getter closer to completion on the bathroom. Progress is happening at a slow pace...

Wednesday, May 12, 2010

Bathroom Progress


The plywood baking for the cedar is up and painted now. The hope is that once the cedar is attached with the exposed stainless steel fasteners to the plywood that it will have a floating effect.

In the end I hope to acheive contrast by having the lighter, warmer, rough materiality of cedar act as an accent off of the heavier solid grey materials.

Bathroom Progress


I purchased almost all my cedar for the additional layer of bathroom material. I finished applying 2 coats of a great product I was lured to - Tung Oil. I thought polyurethane was the only way to get a great finish, but this solvent really brings out a more natural look of the wood without as much sheen. Now to just wait on the tile we ordered for the backsplash so I can put that on the wall then install the Cedar and the Mirror.


Monday, May 3, 2010

Bathroom Progress


We now have the bathroom floor coated nicely with an epoxy and I got the new bathfan/light on 2 seperate switches and moved my old wall sconce into a series of mini can lights with a switch. I also moved the switch box to actually be inside of the bathroom rather than the single switch for the single light that was oddly placed in the hallway. Now just the final layer needs to be developed.

Monday, April 19, 2010

Bathroom Tile


Finished with the tile now, and the fixtures are installed and operating perfectly.

Wednesday, April 14, 2010

Bathroom


Overall bathroom interior elevations. I'll have to see how close I get to this when it's all said and done.

Monday, April 12, 2010

Bathroom Tile


We only have one wall left and then we can grout the bathroom tile. I will take a better picture once it is all done.

Bathroom Tile


Getting the tile put up.

Dumpster Rental


We have finally gotten rid of the indiscribable smell of termite damaged walls and metal lathe that has been fillin our garage for the last 6 months. It's great to be able to use the garage now rather than the living room to cut all our drywall and 2x4's. It was so heavy that one wheel has started to sink into the asphalt driveway.

Thursday, April 1, 2010

Tuesday, March 30, 2010

Kitchen Cabinets


Installed. I made a tiny little mistake and was off by less than 1" on the cabinet over the fridge, so I will have to wait until I order a new smaller window and redo some exterior parts before I can hang the last cabinet. Now to make the countertops, redo my toekick aluminum at the bases, and pour the kitchen floor.

Bathroom Tile


Got all of our bathroom tile. Now to just finish the job in there.

Friday, March 26, 2010

Kitchen Cabinets


We did get the upper cabinets installed now and also put on new hinges on all the cabinet doors, mostly because I am picky and did not want the brass hinges since it would not math the rest of the finishes in the house. I still have to install the base cabinets and probably will not update the cabinets again until I get the kitchen floor done too. Step by step.

Kitchen Cabinets


So we finally got started on the cabinets that we ordered a few weeks back now. After pulling all the cabinet doors off and taking off all the hinges we started to stain everything. The more tedious part than the stain was putting on a coat of poly every night though. It was definitely a drawn out process.

Friday, March 19, 2010

Tuesday, March 16, 2010

Concrete Floor

I poured the rest of the bathroom floor. I will attach some pictures as soon as it cures a little more and I have sanded it down a little. I added some charcoal concrete coloring to the mix and it surprisingly didnt tuen out much darker than the concrete next to it without coloring.

Skylight Well


'Finished' the skylight well in the attic space (except for adding skylights, of course) with the exception of some touch ups. Will add a picture to this post once I remember to download the picture. Pulled up all the walkway boards I had put up there for the last couple months.